Arduino traffic lights

A colorful status indicator using three LEDs and an Arduino.

Connecting the LEDs

We will be using the PWM enabled(~) Arduino pins 9, 10, 11.

LED Setup

Use 1kΩ resistors to limit the LED currents.

Initializing the LEDs (naively)

How we would have initialized the LED in the previous tutorial:

1 void setup() {
2   pinMode(9, OUTPUT);
3   pinMode(10, OUTPUT);
4   pinMode(11, OUTPUT);
5 }

Three nearly identical lines? What a waste of space!

Initializing the LEDs (cleverly)

1 int leds[]= {9, 10, 11};
2 
3 void setup() {
4   for (int i=0; i<3; i++) {
5     /* TODO */
6   }
7 }

Replace /* TODO */ with a line of code so that all leds will be set as output.

Also turn on all LEDs to see if you were sucessful.

Use the leds array!

Initializing the LEDs (cleverly)

1 int leds[]= {9, 10, 11};
2 
3 void setup() {
4   for (int i=0; i<3; i++) {
5     pinMode(leds[i], OUTPUT);
6     digitalWrite(leds[i], HIGH);
7   }
8 }

Now the LED initialization only uses four lines.

A reduction by -1 line!

Loops in loops

 1 void loop()
 2 {
 3   for (int phase=0; phase<4; phase++) {
 4     for (int lnum=0; lnum<3; lnum++) {
 5       digitalWrite(leds[lnum], states[phase][lnum]);
 6     }
 7 
 8     delay(3000);
 9   }
10 }

Arrays in arrays

1 boolean states[4][3]= {
2   {true,  true,  true},
3   {false, false, true},
4   {false, true,  false},
5   {false, false, false}
6 };

Download the .ino file above

Edit the states array to make the LEDs light up in the following order:

red -> red and yellow -> green -> yellow

Traffic control (optional)

The phases on a traffic light are not equally long.

Use the following array to control the phase durations:

int state_durations[]= {5000, 500, 2000, 1000};

Code red! Code red!

Traffic light like indicators can also be used for more general status signaling:

Rotary input

We will use a potentiometer as input for our status indicator.

Potentiometer

Analog read

To read an analog value as produced by the potentiometer analogRead can be used.

Potentiometer

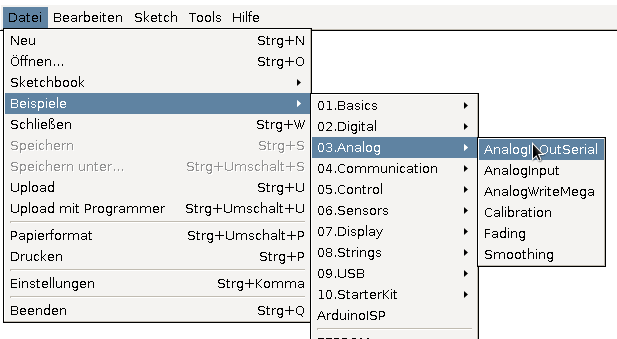
To learn how analogRead works upload the AnalogInOutSerial example to your Arduino.

Serial Monitor

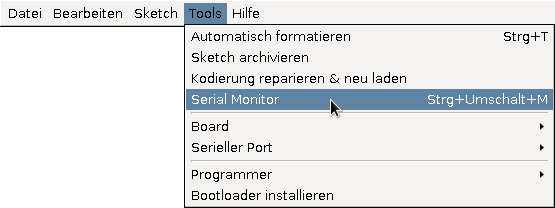
The example sends text output to the computer.

To view the output you can use Arduinos Serial monitor.

Serial monitor

Analog read

What does the example teach us?

Status indicator

Implement the following analogRead value <-> led color mapping:

Use an int variable to store the analogRead value.

Use if statements to to check the range the value is in.

Bonus: Use analogWrite to gradually fade between the led colors.

Working example

1 int defcon= analogRead(A0);
2 
3 if (defcon <= 255) {
4   digitalWrite(leds[0], HIGH);
5 }
6 else {
7   digitalWrite(leds[0], LOW);
8 }

(more compact example)

(fading example)

Using serial communication

To use serial communication in your program, the Serial library has to be set up.

1 void setup() {
2   Serial.begin(9600);
3 }

9600 is the transfer speed in Baud.

9600 Baud is a safe (and super slow) default you should use in your code.

Serial.print{,ln}

To send text to the computer you can use the Serial.print and Serial.println functions.

Serial.print{,ln}

Write a program in which you initialize the following variables to your birthday:

int year, int month, int day.

Also initialize the variable float my_pi to your estimation of the number π (3.14…).

Use statements like Serial.print("Text") and Serial.println(year) to print a message in the following format:

I am <Name>,
born <day>.<month>.<year>
Pi is: <my_pi>

Working example

1 Serial.println("I am Max Mustermann");
2 
3 Serial.print("born: ");
4 Serial.print(day);
5 Serial.print(".");